GNU gdb (Ubuntu 7.11.90.20161005-0ubuntu1) 7.11.90.20161005-git Copyright (C) 2016 Free Software Foundation, Inc. License GPLv3+: GNU GPL version 3or later <http://gnu.org/licenses/gpl.html> This is free software: you are free to change and redistribute it. There is NO WARRANTY, to the extent permitted by law. Type "show copying" and"show warranty"for details. This GDB was configured as"x86_64-linux-gnu". Type "show configuration"for configuration details. For bug reporting instructions, please see: <http://www.gnu.org/software/gdb/bugs/>. Find the GDB manual and other documentation resources online at: <http://www.gnu.org/software/gdb/documentation/>. For help, type "help". Type "apropos word" to search for commands related to "word"... Reading symbols from hello...done. (gdb) q
注:按 q 退出 gdb
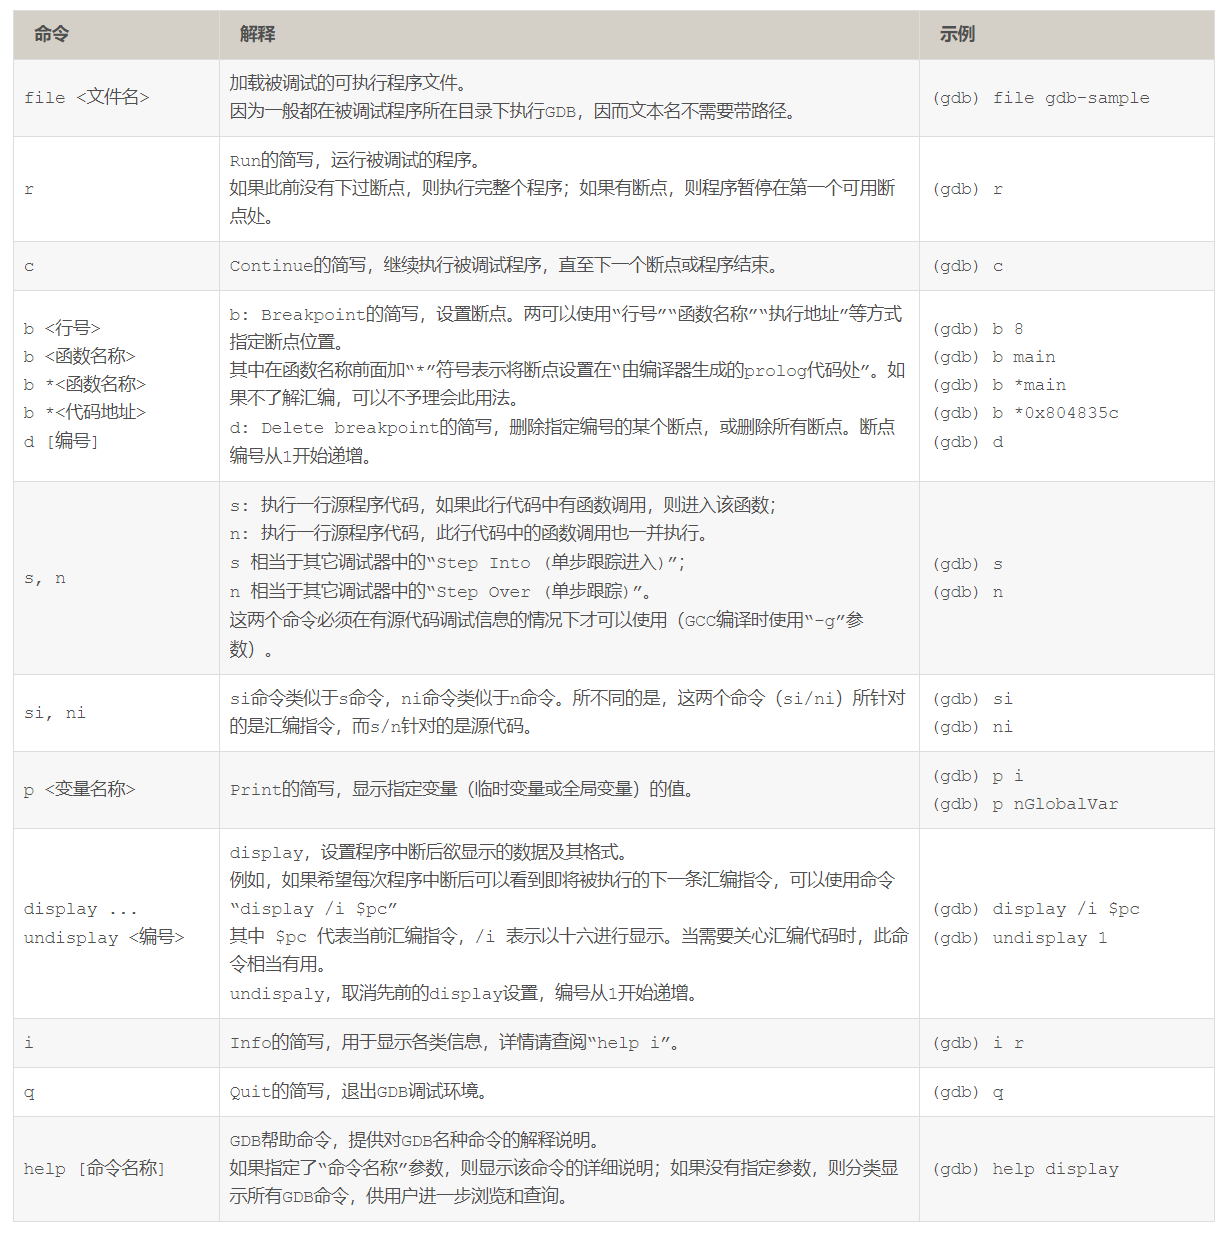
使用 gdb 提供的 file 命令
在 gdb 环境中使用 file 命令,我们需要先进入 gdb 环境下:
1
gdb
使用 file hello 载入待调试程序:
1 2 3 4
... (gdb) file hello Reading symbols from hello...done. (gdb) q
gdb attach运行进程
gdb -p pid(进程就停止运行了) gdb detach后,程序就会继续运行了!
3. 查看调试程序
在 gdb 下查看调试程序使用命令 list 或简写 l,「回车」列出后面程序:
1 2 3 4 5 6 7 8 9 10 11 12 13 14 15 16 17 18 19
(gdb) list 1#include<stdio.h> 2 3intadd(int x, int y){ 4return x + y; 5 } 6 7 8intmain(){ 9int a = 1; 10int b = 2; (gdb) 11printf("a = %d\n", a); 12printf("b = %d\n", b); 13 14int c = add(a, b); 15printf("%d + %d = %d\n", a, b, c); 16return0; 17 }
4. 添加断点
在 gdb 下添加断点使用命令 break 或简写 b,有下面几个常见用法(这里统一用 b):
b function_name
b row_num
b file_name:row_num
b row_num if condition
比如我们以第一个为例,在 main 函数上添加断点:
1 2
(gdb) bmain Breakpoint 1 at 0x6e8: file hello.c, line 4.
(gdb) ib Num Type Disp Enb Address What 1 breakpoint keep y0x00000000000006e8 in main at hello.c:4
可以看到打印出刚才添加的 main 函数的断点信息:编号,类型,显示状态,是否启用,地址,其他信息,那又如何删除这个断点呢?
6. 禁用断点
在 gdb 下禁用断点使用命令 disable Num,比如禁用刚才打的断点:
1 2 3 4
(gdb) disable 1 (gdb) i b Num Type Disp Enb Address What 1 breakpoint keep n 0x00000000000006e8 in main at hello.c:4
可以看到字段「Enb」已经变为 n,表示这个断点已经被禁用了。
7. 删除断点
在 gdb 下删除断点使用命令 delete 断点 Num 或简写 d Num,比如删除刚才的 Num = 1 的断点:
1 2 3
(gdb) d 1 (gdb) i b No breakpoints or watchpoints.
删除后再次查看断点,提示当前没有断点,说明删除成功啦,下面来运行程序试试。
8. 运行程序
在 gdb 下使用命令 run 或简写 r 来运行当前载入的程序:
1 2 3 4 5 6
(gdb) r Starting program: /home/orange/Desktop/gdb/hello a = 1 b = 2 1 + 2 = 3 [Inferior 1 (process 10415) exited normally]
我这次没有添加断点,程序全速运行,然后正常退出了。
9. 单步执行下一步
在 gdb 下使用命令 next 或简写 n 来单步执行下一步,假设我们在 main 打了断点:
1 2 3 4 5 6 7 8 9
(gdb) b main Breakpoint 1 at 0x6e8: file hello.c, line 4. (gdb) r Starting program: /home/orange/Desktop/gdb/hello
Breakpoint 1, main () at hello.c:4 4int a = 1; (gdb) n 5printf("a = %d\n", a);
可以看到当前停在 int a = 1; 这一行,按 n 执行了下一句代码 printf("a = %d\n", a);
10. 跳入,跳出函数
在 gdb 下使用命令 step 或简写 s 来跳入一个函数,使用 finish 来跳出一个函数,我们在第 14 行 int c = add(a, b); 添加一个断点:
1 2 3 4 5 6 7 8 9 10 11 12 13 14 15 16 17 18 19
(gdb) b 14 Breakpoint 1 at 0x6f6: file hello.c, line 14. (gdb) r Starting program: /home/orange/Desktop/gdb/hello a = 1 b = 2
Breakpoint 1, main () at hello.c:14 14int c = add(a, b); (gdb) s add (x=1, y=2) at hello.c:4 4 return x + y; (gdb) finish Run till exit from#0 add (x=1, y=2) at hello.c:4 0x0000555555554705inmain () at hello.c:14 14 int c = add(a, b); Value returned is $1 = 3 (gdb) n 15 printf("%d + %d = %d\n", a, b, c);
这个过程是这样的:
在 14 行 int c = add(a, b); 添加断点
程序运行并停到 int c = add(a, b); 这一行
s 跳入 add 函数
finish 跳出 add 函数,并输出一些函数返回的信息
11. 打印变量
在 gdb 中使用命令 print var 或简写 p var 来打印一个变量或者函数的返回值,我们在第 10 行 int b = 2; 添加一个断点:
1 2 3 4 5 6 7 8 9
(gdb) b 10 Breakpoint 1 at 0x6c3: file hello.c, line 10. (gdb) r Starting program: /home/orange/Desktop/gdb/hello
Breakpoint 1, main () at hello.c:10 10 int b = 2; (gdb) p a $1 = 1
我们打印出变量 a 的值为 1,在调试中比较频繁的操作是「监视变量」,在 gdb 中如何做呢?
12. 监控变量
Hardware watchpoints are special breakpoints that will trigger whenever an expression changes. Often you just want to know when a variable changes (is written to), and for that you can use the watch command.
在 gdb 中使用命令 watch var 来监控一个变量,使用 info watch 来查看监控的变量,我们这里来监控变量 c:
1 2 3 4 5 6 7 8 9 10 11 12 13 14
(gdb) b 14 Breakpoint 1 at 0x6f6: file hello.c, line 14. (gdb) r Starting program: /home/orange/Desktop/gdb/hello a = 1 b = 2
Breakpoint 1, main () at hello.c:14 14int c = add(a, b); (gdb) watch c Hardware watchpoint 2: c (gdb) info watch Num Type Disp Enb Address What 2 hw watchpoint keep y c
注意:程序必须要先运行才能监控。
13. 查看变量类型
在 gdb 下使用命令 whatis 查看一个变量的类型:
1 2 3 4 5 6 7 8 9
(gdb) b 10 Breakpoint 1 at 0x6c3: file hello.c, line 10. (gdb) r Starting program: /home/orange/Desktop/gdb/hello
Breakpoint 1, main () at hello.c:10 10int b = 2; (gdb) whatis b type = int