每周分享第8期
文章目录
用 GitLab CI 进行持续集成
- Pipeline
- Stages
- Jobs
1
2
3
4
5
6
7
8
9
10
11
12
13
14
15
16
17
18
19
20
21
22
23
24
25
+------------------+ +----------------+
| | trigger | |
| Commit / MR +---------->+ Pipeline |
| | | |
+------------------+ +----------------+
+--------------------------------------------------------+
| |
| Pipeline |
| |
| +-----------+ +------------+ +------------+ |
| | Stage 1 |---->| Stage 2 |----->| Stage 3 | |
| +-----------+ +------------+ +------------+ |
| |
+--------------------------------------------------------+
+------------------------------------------+
| |
| Stage 1 |
| |
| +---------+ +---------+ +---------+ |
| | Job 1 | | Job 2 | | Job 3 | |
| +---------+ +---------+ +---------+ |
| |
+------------------------------------------+
CPUID
https://en.wikichip.org/wiki/intel/cpuid
该网页可以查询不同型号处理器的family code与model code。如: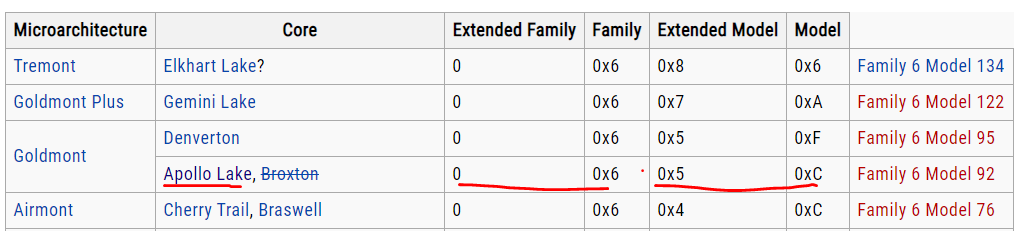
航拍稻城亚丁
https://www.bilibili.com/video/BV1AW41167HD
Zephyr
https://docs.zephyrproject.org/1.14.1/introduction/index.html
Zephyr是一个面向物联网的嵌入式实时操作系统(RTOS)。
eMMC
eMMC,全称为“embedded Multi Media Card”,即嵌入式的多媒体存储卡,就是将Flash存储器和控制芯片封装到了一起。
UFS
https://zhuanlan.zhihu.com/p/69485904
通用闪存存储(Universal Flash Storage,简称UFS)标准。如今的UFS2.0,理论带宽已经可以达到1.5GB/s,理论上比eMMC5.1的两倍还要快。
现在一般手机配的是eMMC,旗舰高端手机配的是UFS。
修改grub默认启动项
https://my.oschina.net/sukai/blog/287546
- 查看grub.cfg文件,Debian中位置为 /boot/grub/grub.cfg
找到所有的”menuentry”,这表示每个操作系统的入口.此处共有5个,序号从0开始,分别0,1,2,3,4, 系统默认启动第0项,此处即为Debian.假如要设置默认启动 “Arch (on /dev/sda13)”,那么其序号为3.1
2
3
4
5
6
7
8
9
10
11
12
13
14
15
16
17
18
19
20
21
22
23
24
25
26
27
28
29
30
31
32
33
34
35
36
37
38
39
40
41
42
43
44
45
46
47
48
49
50
51
52
53
54
55### BEGIN /etc/grub.d/10_linux ###
menuentry 'Debian GNU/Linux,Linux 3.2.0-4-686-pae' --class debian --class gnu-linux --class gnu --class os {
load_video
insmod gzio
insmod part_msdos
insmod ext2
set root='(hd0,msdos11)'
search --no-floppy --fs-uuid --set=root ee17a8a7-1585-4ebb-887e-f29d9477f679
echo '载入 Linux 3.2.0-4-686-pae ...'
linux /boot/vmlinuz-3.2.0-4-686-pae root=UUID=ee17a8a7-1585-4ebb-887e-f29d9477f679 ro quiet
echo '载入初始化内存盘...'
initrd /boot/initrd.img-3.2.0-4-686-pae
}
menuentry 'Debian GNU/Linux,Linux 3.2.0-4-686-pae (恢复模式)' --class debian --class gnu-linux --class gnu --class os {
load_video
insmod gzio
insmod part_msdos
insmod ext2
set root='(hd0,msdos11)'
search --no-floppy --fs-uuid --set=root ee17a8a7-1585-4ebb-887e-f29d9477f679
echo '载入 Linux 3.2.0-4-686-pae ...'
linux /boot/vmlinuz-3.2.0-4-686-pae root=UUID=ee17a8a7-1585-4ebb-887e-f29d9477f679 ro single
echo '载入初始化内存盘...'
initrd /boot/initrd.img-3.2.0-4-686-pae
}
### END /etc/grub.d/10_linux ###
### BEGIN /etc/grub.d/20_linux_xen ###
### END /etc/grub.d/20_linux_xen ###
### BEGIN /etc/grub.d/30_os-prober ###
menuentry "Windows Vista (loader) (on /dev/sda1)" --class windows --class os {
insmod part_msdos
insmod ntfs
set root='(hd0,msdos1)'
search --no-floppy --fs-uuid --set=root 000A41F2000009A5
chainloader +1
}
menuentry "Arch (on /dev/sda13)" --class gnu-linux --class gnu --class os {
insmod part_msdos
insmod ext2
set root='(hd0,msdos13)'
search --no-floppy --fs-uuid --set=root eb352014-f4ce-4479-b2ad-ea222d197dc3
linux /boot/vmlinuz-linux root=/dev/sda13
initrd /boot/initramfs-linux.img
}
menuentry "Linux From Scratch (SVN-20130711) (on /dev/sda9)" --class gnu-linux --class gnu --class os {
insmod part_msdos
insmod ext2
set root='(hd0,msdos9)'
search --no-floppy --fs-uuid --set=root 0b97772d-0998-4749-b8c2-69a25bade4c5
linux /boot/vmlinuz-3.10-lfs-SVN-20130711 root=/dev/sda9
}
### END /etc/grub.d/30_os-prober ###
- 打开/etc/default/grub,找到GRUB_DEFAULT一行,将值改为3
- 更新grub
sudo update-grub
Uses of the monitor/mwait instructions
https://stackoverflow.com/questions/57471862/uses-of-the-monitor-mwait-instructions
What are the semantics of these instructions?
The general idea is that instead of having a polling loop (e.g. while( *foo == 0) {}) you set up the monitor (using monitor) then check the condition, then (if the condition hasn’t happened) wait for the monitor to be triggered (using mwait). This allows the CPU to consume less power (and/or lets a different logical processor in the same core run better) while waiting for the condition to change.
However; there can be false positives (writes to something else in the same cache line) and other things (IRQs) that cause mwait to stop waiting. For that reason you still need to check the condition in a loop; so the whole thing ends up like (e.g.) monitor(foo); while(*foo == 0) { mwait(); }.
罗翔讲刑法
https://www.bilibili.com/video/BV1dj411f7vb